Before you get started, let's be sure you have the right size!
| Which holds true for you? | |
| Are your gloves a little snug but would fit just right with a little work? | If yes, check out the information below. |
| Are your gloves WAY too small? | If yes, start a return. |
| Are your gloves too big? | If yes, start a return. |
THE OVEN METHOD
Don't want to wait for your gloves to break-in through use? We've got you covered. The fastest way to get out there and give'r with gloves that fit just right is through the Oven Method. Check out the video below to give our tried-and-true Oven Method a go.
Step by Step Guide
Step #1: Set your oven to 200 degrees Fahrenheit.
Step #2: Once heated, pop your gloves or mittens in the oven. We recommend placing them in an “A-Frame” with thumbs facing inward and steel D-rings pointing up. If you have wrist leashes, be sure to remove them first so they don’t burn!
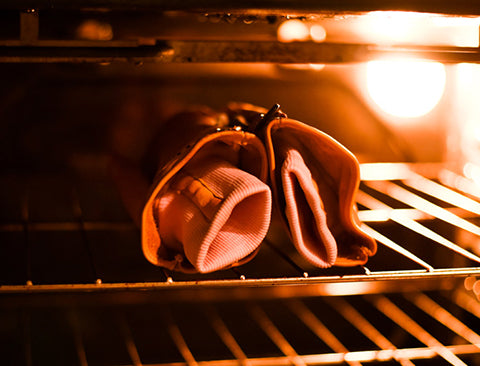
Step #3: Set a timer for 4 minutes.
Step #4: When the timer is up, take out your gloves and immediately put them on while they’re still warm.
Step #5: With the leather soft and supple from the oven, grab a broom and sweep the deck, hold on to some ski poles and practice your mid-slope photo pose, or simply squeeze your hand into a fist like you’re working a stress ball. These grabbing actions help create memory in the leather while packing out the insulation to form the gloves to your hands quicker. And don’t forget to work that thumb, mitten bakers!
Step #6: Get stoked on a pair that not only fits like a glove…but fits like YOUR glove!
Tip from the Tetons! When removing the gloves, especially during break in, pinch the middle finger/area (4-Season Gloves/ Frontier Mittens) or mitten + index finger (Expedition Split Mitten) to keep the lining in place. It will become easier to take your hand in and out as you break in your split mittens.